Showing posts with label recipes. Show all posts

Saturday, January 16, 2010

Coffee Break!

If you're an avid cook or baker there's one place in town that you just have to visit. It's the restaurant supply store. A few years ago I was looking for a Bunn style coffee maker and heard that the restaurant store had some used models for sale. So we took a drive over to check them out.

What an awesome place. You know how kids like the candy store? That's how I feel when I visit the restaurant store. They have the neatest things.

I remembered the first time I went, they had these really large rubber spatulas. It was all one piece so the spatula part wouldn't work its way off at a crucial time! So since the old ones I had were finally
tearing apart I asked my husband to pick me a new one up as a Christmas present.

Well, in case you didn't already know, I have an extremely thoughtful husband. Not only did he buy me a spatula, he bought me two. Yay! But what I really want to tell you about today is the other thing he bought me at the awesome restaurant store. (Did I tell you this store is cool?)

Because my baking sheets were pretty much black from over 20 years of usage, I thought it might be time to get some new ones. So while he was shopping he bought me a giant baking sheet like they have at the bakeries. But the salesman didn't let him stop there. He told him about the new teflon baking sheets. It's just what it says. It's a flexible sheet of teflon that you place on the baking sheet (instead of parchment paper). Anything you cook on it will NOT stick. After removing your items, just wash it off, it's even dishwasher safe! So hubby bought me a sheet to go with the new pan.

Here it is...


I tried barbecue ribs for my first experiment, they always leave a stuck-on mess...


Yep, that's what always happens, black, burnt sauce that I have to scrub and scrub off...


But not this time... look closely at the burnt sauce.. I just lifted it up with a fork. I served the ribs and wiped away the sauce. Awesome!


The sauce did not leak through the teflon sheeting so my pan is as good as new!


Run, don't walk to your nearest restaurant supply store. Buy yourself a sheet and see for yourself. You won't regret it. By the way, this sheet will last for over 6,000 uses. Let's just say....that's a long time.

So remember, the moral of the story is, less time scrubbing, more time doing FUN stuff!

Blessings to you,
Jessica

Monday, January 4, 2010

Happy New Year!


Happy New Year to Everybody! Snow is everywhere here and all kinds of snowmen are popping up in our neighbourhood. Our holidays were filled with shopping, parties, warm visits with family and friends, and simple quiet times. I also enjoyed fun visits with our neighbours while delivering their annual holiday treats.

This year I put together gift bags with Christmas tins containing Puppy Chow (a delicious snack made with Shreddies/Chex cereal, chocolate and peanut butter) and decorated jars with Double Chocolate Cookie Mixes. I also slipped in special recipe cards for those treats and our Christmas photo of Gus, the Big White Dog. I've mentioned them before but we really do have great neighbours -- we all look out for one another while still minding our own business, a perfect combination.

So today I'd like to start off with a quote that came across my path the other day. It keeps coming to mind (which is probably a good thing) and has helped make a difference in my life. Perhaps it will in yours.

Be not angry that you cannot make others
as you wish them to be,

since you cannot make yourself
as you wish to be -

Thomas a Kempis


Blessings,
Jessica


Monday, December 21, 2009

Coffee Break!!


If you have a few minutes to spare this last week before Christmas I hope you'll consider adding today's Coffee Break! recipe to your holiday menu. In fact, it would be perfect for a New Year's get-together.


This past Sunday evening our church had our annual Christmas by the Fireside! This is the time when we convert our church into an informal living room, complete with electric fireplace and furniture. This year everyone gathered around to sing Christmas carols, listen to some beautiful orchestra music, special songs by the children, a funny skit and of course, the Christmas story play put on the the children.

During the intermission, there were lots of treats to sample - our church has some of the best cooks going and everything was delicious.

It was nice to hear so many comments about how relaxing their time was. That is always our goal - just a fun time to enjoy one another's company and to wish each other sincere holiday greetings. I really look forward to this event every year.

So, here is the recipe for this simple holiday treat.

What you'll need:
- 2 8-ounce tubes of crescent rolls*
- 1 8-ounce package of softened cream cheese
- 1/2 cup of sour cream
- 1 teaspoon of dill weed
- 1/8 teaspoon of garlic powder
- 1 1/2 cups of broccoli florets (freshly chopped)
- 1 cup of celery (finely chopped)
- 1/2 cup of sweet red pepper (finely chopped)
- Celery leaves

* found in the refrigerator section of your grocery store

First, preheat the oven to 375 degrees F.

Next, remove the crescent roll dough from its packaging (make sure you don't unroll it). Cut each tube into eight slices and then arrange the slices in a circle (about 11 inches in diameter.) I've found it very handy to make your circle on an pizza pan (ungreased 14-inch size works well.)

Then, bake it for approximately 15-20 minutes or until the dough turns a lovely golden color. Cool for 5 minutes or so before gently removing your crescent dough wreath to a serving platter. Then, cool it completely.

In a small mixing bowl, beat the sour cream, cream cheese, garlic powder and dill until nice and smooth. Then, spread the mixture over the wreath and top with the chopped celery, broccoli, and red pepper. You can complete this pretty picture by making a bow with the leftover celery leaves. Serves 16.

Special Note: This appetizer doesn't transport as easily as some so I made the wreath and bagged the dip and chopped veggies to bring with me to the party. It only took a few moments to assemble.

Last, but not least I wish you all a very Merry Christmas and that you'll find joy in the true meaning of the holiday.

With love,
Jessica

Monday, December 7, 2009

Simple Sweet Treats

Recently I received one of those "Gifts in a Jar" from a dear friend. The recipe was called Chocolate, Chocolate Chip Cookies and little did I know how "dear" my friend was until I requested the secret to that particular jar gift.

The recipe card said to dump the contents of the jar into a large mixing bowl. Then add 1/2 cup oil, 2 eggs and 1 cup of chocolate chips. Mix together, drop by spoonfuls on a cookie sheet and bake for 8-10 minutes. And 'Voila!
' You have delicious cookies.

And delicious cookies they were. I brought a plate to my unsuspecting husband and his friend who were sitting by the wood stove with coffee cups in hand.

After a few bites all I heard was, "Wow! These are awesome."

So, today I share with you the minor detail left out of this recipe. That is, just what was the contents of the jar? It was simply a chocolate cake mix from a box.

Please, please, make these cookies for your family, friends, neighbor's, co-workers etc. They'll be a hit, you won't be stressed with a complicated recipe and you'll be delighted that something so simple could bring so much pleasure.

Here again is the recipe:

1 Chocolate cake mix
1/2 cup vegetable oil
2 eggs
1 cup chocolate chips

Combine cake mix, oil and eggs into a large mixing bowl. Stir in 1 cup of chocolate chips. Mix together, drop by spoonfuls on a cookie sheet and bake at 350 degrees for 8-10 minutes. Avoid overbaking and allow to cool a couple minutes before placing them on a cooling rack.

And don't forget this makes a wonderful housewarming gift when given as a decorated "Gift in a Jar."

Sharing the love,
Jessica

Saturday, October 24, 2009

It's Nice to be Appreciated, Isn't It?

In our church we have so many wonderful people, many of whom have volunteered many hundreds of hours of volunteer labor. And because our church wouldn't function nearly as smoothly without their dedication we believe in recognizing their efforts.

So today, my husband and I hosted an Appreciation Luncheon for our wonderful nursery workers. These are the ladies who spend time caring for the little ones in our church, from the tiny infants to the really, REALLY active three-year olds!

I'd venture to say that some days they hazard their lives in order to minister to these young children. Whether it's comforting one who misses their parent or maybe it's just cleaning up those unexpected messes!

Today we simply wanted to acknowledge their dedication and faithfulness (we almost never have a need for a substitute worker) by treating them to a nice luncheon.

Our menu consisted of:

Fresh croissant sandwiches with
delicious deli ham or gourmet chicken,
lettuce, tomato and swiss cheese


Homemade Cream of Broccoli Soup

Sweet Seedless Red Grapes

Raspberry Fizz Punch

Cheesecake

Everyone had such a nice relaxing time together and at the end, our Pastor said that he knew diamonds were a girl's best friend, but he couldn't afford those. So since chocolate seemed to be the next choice, he'd bought a ginormous chocolate bar for us to share! It was Swiss chocolate...so smooth and creamy.

Everyone went home happy knowing they were really appreciated.

And for those of you who have read this far, I'm adding the recipe for the Broccoli Soup. It's great treat for a cool autumn afternoon.

Blessings to you,
Jessica

¾ cup chopped onion

4 garlic cloves, finely chopped

2 small carrots, shredded

4 tbsp butter

2 tsp vegetable oil

Salt & pepper

8 tbsp butter

8 tbsp flour

2 cups milk

4 cups water

4 cubes (or tsp) chicken bouillon

2 large heads of broccoli, chopped

1. Sauté onion, garlic and carrot in 4 tbsp of butter and 2 tsp oil for 5-6 minutes over medium heat until onion is transparent. Season lightly with salt and pepper. Remove from heat.

2. In a large saucepan, melt 8 tbsp butter over low heat. Add flour and stir. Add milk, a little at a time, stirring constantly. Stir for a few minutes more over heat until thickened.

3. In a separate saucepan, bring water and bouillon to a boil. Add broth to the milk mixture, stirring constantly.

4. Cook or steam broccoli in rapidly boiling water for 7 minutes. Add broccoli and cooked vegetables to soup base. Stir well and cook on low 7- 10 minutes, covered. Serve.


Tuesday, September 8, 2009

Coffee Break!

Welcome to this week's Coffee Break!

Today we're having
Peachy Peach Pie. A couple weeks ago I picked up several baskets of fresh peaches on sale from the grocery store. And yesterday they were beginning to get overripe so hubby and I cut them up in no time.


I ended up with about 9 cups of sliced peaches which is the perfect amount for a couple of pies. I actually debated about using some of the peaches for

1. Jam, or
2. Cobbler, or
3. Melba or .........

Well, you get the picture. There were so many choices, but the pies won out.


Peachy Peach Pie

2 crust pie dough
4 1/2 cups sliced, peeled peaches
1 tbsp lemon juice
1/4 tsp almond extract (optional)
3 tbsp flour or 1 1/2 tbsp cornstarch
3/4 cup sugar
1/2 tsp salt
1 tbsp butter

Combine cornstarch or flour, sugar and salt and blend thoroughly. Add to peaches and toss together until slices are coated with sugar mixture.

Line a 10 inch pie pan with pie dough. Arrange peaches in crust and sprinkle with a combination of lemon juice and almond extract. Dot with butter.

Adjust the top crust and trim and seal the edges. Bake in a 450F oven for 10 minutes, then reduce the heat to 350F and continue to bake for about 30 minutes, or until peaches are tender. Cool on a wire rack.

Serve warm with vanilla ice cream and coffee.


Have a peachy day,
Jessica

Monday, August 24, 2009

Coffee Break!

Happy Monday to everyone and welcome to this week's Coffee Break!

Here in our region it will soon be time to head out to the orchards and pick baskets of delicious apples to store for the winter.

Our neighbor's apple and pear trees that border our backyard are fully loaded with fruit this year and they look like they're ready to drop off at any moment. I can't help but think of all the delicious treats we'll be enjoying this fall.

Pear compote (for french toast or pancakes)
Apple Pie
Apple Fritters
Apple Crisp
Caramel Apples

And since we had a break in our hot weather today I made the deliciously moist Apple Cake that I discovered a couple of years ago from Katherine.


Fresh Apple Cake

4 cups finely chopped, peeled apples
(about 6 large apples)
2 cups sugar
1/2 cup vegetable oil
2 beaten eggs
2 tsp. vanilla
2 cups all-purpose flour
2 tsp. baking powder
2 tsp. ground cinnamon
1 tsp. salt
1/2 tsp. baking soda
1 cup chopped walnuts (optional)

Preheat oven to 350 and grease a 9x13 or bundt pan.

In a large bowl, combine apples and sugar. Add oil, eggs and vanilla and stir well. In a separate bowl combine flour, baking powder, cinnamon, salt and baking soda.

Add to apple mixture and stir until just moistened. Stir in nuts.

Pour into prepared pan. Bake for 35-40 minutes or until toothpick comes out clean. Cool completely in pan. Slice and enjoy. You won't be disappointed.

Blessings,
Jessica


Saturday, August 1, 2009

A Home for Others


I don't know about you but one of my favorite things is hosting people in my home. I love visits from near and far and the past couple of weeks have been a real joy with several overnight guests. More company stopped in for an overnight stay last night. This sweet senior couple (they're just like family) are from Louisiana so I made sure to cater to their tastes for our supper meal. What did I serve? Shrimp Creole of course, and a delicious garden salad. It was the perfect summer meal for a warm evening.

~~~~~~~~~~~~~~~~~~~~~~~~~~~~~~~~
Shrimp Creole

2 tbsp. cooking oil
2 tbsp. flour
2 tsp. chili powder
1 tsp. salt
1/8 tsp. pepper

1 19 oz. can Aylmer stewed tomatoes
1 tsp. Worcestershire sauce
1tbsp. white vinegar
2 tsp. granulated sugar
1/2 tsp. fresh basil

1 lb. medium or large shrimp, cooked
2 cups peas & carrots, cooked

Heat oil in frying pan. Mix in flour, chili powder, salt & pepper.

Add tomatoes, Worcestershire sauce, vinegar, sugar and basil. heat and stir until boiling and thickened.

Add shrimp and vegetables. Heat through. Make a ring of cooked white rice on a large plate. Pour shrimp mixture into center of ring. Serves 4.

~~~~~~~~~~~~~~~~~~~~~~~~~~~~~~~~

Afterward we ventured out to the neighborhood ice cream stand for a special treat! It was so nice to visit together.

Now I'm changing bed linens and making
Children's Favourites to have on hand for our next guests which arrive tomorrow afternoon. Yeah!! I'm so glad our home can be used for others. And finally, Monday we're getting our summer break and we're off for a week to a campmeeting where we'll be seeing friends and family.

Blessings,
Jessica

Tuesday, July 28, 2009

Banana Sour Cream Muffins

Early this morning we said goodbye to our dear guests visiting from a town nearly 32 driving hours away. It was so nice because even though it had been nearly ten years since we were together last, we just picked up where we left off. They came to witness the wedding of their son and so we were honored to have them in our home.

Because our friends planned to be out and about during their visit I wasn't required to prepare formal meals. But I wanted to have a few things on hand for them to grab-n-go. That's where this recipe comes in.

The morning before they departed I whipped these treats up and they were a big hit. I'm sure they will be at your home too.

Banana Sour Cream Muffins
1 3/4 cups all purpose flour

1 tsp. baking soda
1/4 tsp. salt

1/2 cup butter or margarine
1 1/4 cups granulated sugar
2 eggs
1/4 cup sour cream
1 cup mashed bananas (about 3 medium)

Put flour, soda and salt in a large bowl. Stir. Make a well in the center.

In another bowl cream butter, sugar and one egg. Beat in second egg. Mix in sour cream and bananas. Pour into well and stir to mix. Ignore lumps. Fill greased baking cups 3/4 full. Bake in 400F oven for 15 to 20 minutes. Makes about 16 muffins.

P.S. Our friends didn't hesitate when I offered to send the remaining muffins with them on their long drive home. So now I need to make a new batch for us!

I've had a busy morning taking care of tax customers and cleaning up our spindles for our new indoor stairs so now I'm off to do a little relaxing in the pool. The sun is shining brightly today!

Blessings,
Jessica

Monday, March 2, 2009

Coffee Break!

During this week's Coffee Break you'll want to jot down this quick and easy recipe for these fabulously delicious Chicken Enchiladas!

My dear friend Steph shared this recipe with me over fifteen years ago and last night I somehow remembered that I had the ingredients for this great dish. All day long I couldn't wait for supper. It took
only 10 minutes to whip it up (the chicken was pre-cooked) and pop into the oven.


10 -12 small tortillas
4-5 chicken breasts, cooked and chopped
1 cup sour cream
2 cans cream of chicken soup
1 1/2 cup shredded cheddar cheese
1/2 cup chunky salsa
1 can enchilada sauce

Combine chicken, sour cream, soup, 1 cup of the cheese and salsa in a large bowl. Mix well. Spread a large spoonful of enchilada sauce on tortilla. Fill each tortilla with chicken mixture and roll up. Place in a greased baking dish.

Cover with remaining enchilada sauce and remaining cheese. Bake at 350 degrees for 30 minutes or until bubbly. Serve with your favorite nacho style chips and con queso sauce.

I really hope you've enjoyed today's Coffee Break and I look forward to your comments.

Jessica

Sunday, January 25, 2009

Coffee Break!

Cheese Ball that's not a Cheese Ball!


This week's Coffee Break contains an easy hors d'oeurve (you probably know that's a fancy word for 'snack') you'll be proud to serve your guests... even if it's chip and dip night! I served these delights at our Christmas Open House and I can't tell you how many people raved about them.

16 oz. cream cheese, softened

1/2 cup (or to your taste) of your favorite dip spice
(I used sundried tomato and basil)

1/2 thick star cookie cutter

In a mixing bowl, beat cheese and spice together until well blended. Form into a ball, cover well and chill in refrigerator for about an hour.


Remove cheese ball from refrigerator and press cheese onto cutting surface until it's about 1/2 inch thick. Working quickly, cut shapes with the cookie cutter. If the cheese becomes too soft to handle, return to refrigerator to chill. Place shapes on a plate, cover and return to refrigerator until ready to serve with your favorite crackers!

Cheers,
Jessica

Sunday, December 21, 2008

Happy New Year!

As a year-end treat I want to share with you a sweet treat that we enjoy each year. Many years ago I married into a family that has brought me much joy, laughter and friendship over the years. And along with all of that this wonderful family seems to have had that special touch in the kitchen which I have tried to incorporate into our own home.

You probably weren't aware but most of the recipes featured here have come from these very same relatives and today is no different. Today's Chocolate Dipped Peanut Butter Balls were stolen from my sister-in-law Sandy. Famous for her late-night chats, she's always a wealth of ideas, stories and advice.

So here goes.....

2 cups peanut butter
1 cup margarine
1 pound confectionery sugar
4 cups rice krispies
2 cups chocolate chips

colored sprinkles

I use my large teflon coated wok to melt the margarine. Add peanut butter and melt together on low heat. Remove from heat. Add sugar and then rice krispies stirring with a wooden spoon to combine well. Mix with hands if necessary.


Form balls and place them on cookie trays lined with wax paper (or grease the sheets). Place in refrigerator for approximately 20 minutes to harden. Melt chocolate chips in a double boiler. Dip tops of balls in chocolate and then sprinkles as desired.
Return to refrigerator.


Happy New Year to you. May you enjoy God's richest blessings in 2009.

Jessica

Monday, December 8, 2008

Christmas Baking Begins!


It was a wintry snowy morning - the perfect time to heat up the oven and gather 'round the baking dish to make iced sugar cookies. At 9:00 am five young helpers arrived at my invitation and we began rolling and cutting out the delicious cookie dough. Some were very thin, some were very fat but all were perfect. The sun came out and shone through my dining room lighting up our handiwork.


Sugar Cookies...

3 1/2 cups all purpose flour
1/4 teaspoon salt
1 teaspoon baking powder
1 cup butter, room temperature
1 1/2 cups granulated white sugar
2 large eggs

2 teaspoons pure vanilla extract


In a separate bowl whisk together the flour, salt, and baking powder. Set aside.

In the bowl of your electric mixer (or with a hand mixer), beat the butter and sugar until light and fluffy (about 3 to 4 minutes). Add the eggs and vanilla and beat until combined. Add the flour mixture and beat until you have a smooth dough.

Divide the dough in half and wrap each half in plastic wrap . Refrigerate for about one hour or until firm enough to roll.

Preheat oven to 350 degrees F (177 degrees C) and place rack in center of oven.

Remove one half of the chilled dough from the refrigerator and, on a lightly floured surface, roll out the dough to a thickness of 1/4 inch (1 cm). (Keep turning the dough as you roll, making sure the dough does not stick to the counter.) Cut out desired shapes using a lightly floured cookie cutter and transfer cookies to the prepared baking sheet.

(TIP...Place the baking sheets with the unbaked cookies in the refrigerator for 10 to 15 minutes to chill the dough which prevents the cookies from spreading and losing their shape while baking.)

If you are not going to frost the baked cookies, you may want to sprinkle the unbaked cookies with crystal or sparkling sugar.


Icing...
2 large egg whites
2 tsp lemon juice
3 cups sifted confectioner's sugar

In the bowl of your electric mixer (or with a hand mixer), beat the egg whites with the lemon juice. Add the sifted powdered sugar and beat on low speed until combined and smooth. The icing needs to be used immediately or transferred to an airtight container as royal icing hardens when exposed to air. Cover with plastic wrap when not in use.

Divide icing into separate portions and add food colouring as desired. Mix well. Pour each colour into a ziploc style sandwich bag and seal well. Cut a tiny bit off one of the bottom corners to use as an icing bag. Decorate cookies as desired.

Merry Christmas...
Jessica
Tuesday, November 25, 2008

Coffee Break!

Welcome again to this week's Coffee Break. Today's feature is Lemon Loaf Bread.


Here's a quick loaf recipe that is a great alternative from the chocolate-rich sweets during the holidays. The sweet & sour flavor really gets your attention and it's sure to be gobbled up in no time.
Here's what you need...

5 tbsp. shortening
1 cup sugar
2 beaten eggs
Grated rind of one lemon
1+ 1/2 cups sifted flour
1 tsp. baking powder
1/2 tsp. salt
1/2 cup milk

Juice from one lemon
1/3 cup sugar


In a medium mixing bowl beat together shortening, sugar, eggs and lemon rind.

In a separate bowl sift together flour, baking powder and salt. Add to sugar mixture and beat well.

Pour in milk and stir in at medium speed (otherwise it will splash all over).

Pour into a greased bread pan and bake at 350F for the first ten minutes. Then reduce heat to 300F for an additional 50 minutes. Loaf is done when an inserted toothpick comes out clean.

Let loaf cool for a few minutes and then turn onto serving plate. While still hot pour juice of lemon and sugar mixture over the top and let drizzle down over the sides. This is great served after the juice has had time to soak in.


Mine's in the oven now and when it's done I'll post the photo! Cheers,

Jessica

Thursday, November 13, 2008

Fabulous Gum Drop Cake


Just in time for the Holiday Season comes this fabulous recipe which was given to me by my good friend Peggy E.

1 cup butter
2 cups white sugar
3 eggs
1 tsp. lemon extract
1 tsp. vanilla extract
1 cup warm milk
3 cups all purpose flour
1 1/2 tsp. baking powder
250 grams baking gums

Using scissors, cut baking gums into small pieces (about the size of a small pea) and drop them into a bowl lightly coating them with flour.

Cream butter and sugar in a large mixing bowl. Add eggs, one at a time, beating well after each addition. Add lemon and vanilla and mix well.

In a separate bowl combine flour and baking powder.

Add flour and milk in alternating portions and mix until smooth.

Stir in baking gums.

Pour into a greased bundt pan.

Bake for 2 hours at 275 degrees (or until toothpick comes out clean).

Cool completely.

Slice and serve. (Try not to eat it all in one sitting!)

Portions can be frozen and will keep for several weeks.

Sunday, November 9, 2008

Farm News...

(photo courtesy Holstein Canada)

Recently, one of my good friends, her husband and four children have moved to live on a hobby farm in the country. There's lots of work to do in the days ahead to get the place up to date and livable but already her children are as excited as can be.

They love to share lots of country stories (like the one about finding a dead mouse...in the house... eeewww), and finding a 'swamp' frog. You can just imagine what the poor thing had to endure.

So as a treat for them, I baked the following cookie recipe. It's called Holstein Crinkles and as you can see, the cookies turn out looking like little Holsteins.


Here's the details....

2 cups sugar
1/2 cup vegetable oil
4 squares (1 oz each) unsweetened chocolate, melted & cooled
2 tsp vanilla
4 eggs
2 cups all purpose flour
2 tsp baking powder
1/2 tsp salt
1 cup mini semi sweet chocolate chips
3/4 to 1 cup confectioners' sugar

In a large mixing bowl, combine the sugar, oil, chocolate & vanilla. Add eggs, one at a time, beating well after each addition.

Combine the flour, baking powder and salt; gradually add to chocolate mixture and beat until smooth.

Stir in chocolate chips. Cover and refrigerate for 4 hours or until easy to handle.

Shape dough into 1 inch balls rolling each one in confectioners' sugar. Place 2 inches apart on greased baking sheets.

Bake at 350 for 10-12 minutes. Remove from the oven just while looking a little under done. Otherwise they'll be too dry.

Hope you enjoyed your visit today and that you'll have fun entertaining with these great treats.

Jessica

Thursday, November 6, 2008

Coffee Break!

(***Note to reader...I'm having lots of formatting trouble with blogger today. If you can make sense of this post you get an A+. I'll be working on this problem today.)

(***Update...it's still not perfect but it is better.)


If you're looking for a little update to your Thanksgiving Day menu, you may want to try this week's
delicious Coffee Break recipe. Every time I announce this
wonderful side dish to new guests around our table I'm met with a quizzical look. But after their first bite, the only question that comes is, "Please pass the pineapple cheese thingy!"

So here it is,
Pineapple Cheese Casserole. It makes a great side dish for a wide range of meals but we especially like it with ham, roast pork or beef pot roast. And, I always double the recipe.

20 oz. pineapple chunks
3 tbsp. pineapple juice
1/2 cup sugar

1 cup shredded cheese
3 tbsp flour

1/2 cup melted margarine or butter

1 cup crumbled ritz crackers


Directions:

Drain pineapple reserving 3 tablespoons of juice.
In a mixing bowl, combine sugar and flour. Stir in juice.


Add grated cheese and fruit.


Mix well.

Spoon into greased 1 quart casserole dish.


Combine margarine and crackers.


Sprinkle over top.

Bake at 350 for 20-30 minutes till lightly brown.

(This is where I'd like to show a nice photo of the casserole, but in our haste to sit down to the dinner table I forgot to take the picture. Naturally, the only solution is for you to make this delicious recipe so you can see it for yourself.)

Cheers,
Jessica

Wednesday, September 10, 2008

Homemade Buttermilk Doughnuts

Thanks to my wonderful mother-in-law, it's been over twenty years since I started making homemade buttermilk doughnuts. I can't ever remember a visit to her home when we couldn't find some of these delicious treats tucked away in the tin below the cupboard or in the freezer.

My favourite way to enjoy them is fresh from the fryer, split in half and dipped in homemade strawberry jam. My next favourite way is to shake them in sugar when they've cooled a few minutes. Yum..Yum..

A couple of weeks ago when she came for a week-long visit, I decided to carry on the tradition to let her know how much I appreciate her.

And I don't think it would be very nice of me to carryon about how good these are with sharing the recipe so here goes....

Pour 2 cups of buttermilk and stirr in 2 heaping tsp. of baking soda. In a separte bowl beat 2 eggs. Then add 2 cups sugar, 2 tblsp shortening and 1 tsp. of lemon flavoring. Mix all well and buttermilk. Stir. Add about 6 - 7 cups of white all purpose flour. Dough will be quite sticky. Set in fridge overnight.

In an electric skillet or large pot, heat about 4 lbs. of lard to 350 degrees. Roll dough about 1" thick and cut with a doughnut cutter. Be sure to flour your surface and cutter.


Drop doughnuts into lard. Flip over when lightly browned. Remove from skillet with a large fork and slip onto a wooden dowl in order to remove excess oil.


Then place on paper towels. Allow to cool completely before storing in an airtight container or plastic storage bag.


If preferred, shake warm doughnuts in a bag with sugar to lightly coat them.

Better than the local coffee shop........guaranteed!

Tuesday, September 2, 2008

The Coffee Break - Stuffed French Toast

This week's Coffee Break is all about Stuffed French Toast.

Not too many things taste better than fresh homemade bread! Yesterday I whipped up our family's famous recipe for homemade brown bread. I'm going to let the secret out and share it with you today. It's rich with molasses and oatmeal and I've not met anyone who can resist it yet.

BROWN BREAD

This also makes awesome rolls made in greased muffin pans.

Stir together:

4 cups boiling water

2 cups oatmeal

1 cup molasses (I add a little more)

½ cup sugar

Meanwhile dissolve:

2 tbsp yeast in ½ cup warm water.


When cooled to lukewarm, add yeast to oatmeal mixture.

Add ½ cup shortening and stir till dissolved.

Add about 10 cups of white flour and 2 tsp salt.


Knead till smooth and place in a covered greased bowl to rise double.

Punch down dough, divide into 5 loaves and place in greased loaf pans. Allow to rise.


Bake for approximately 30-35 minutes at 350.

Remove from pans and brush the tops lightly with butter.

Total time: approximately 4 hours


Now for the real fun....

Stuffed French Toast
is a treat that my husband and I discovered last year on our anniversary get-a-way. We overnighted in a beautiful country bed & breakfast and this delightful dish was offered at breakfast. I've never forgotten it...in fact, I added it to my Christmas morning's menu and it's been a hit!

You can use whatever bread you like but I recommend something that is thick sliced and with flavor like cinnamon-raisin bread or even french bread to make mini toasts. (Save that square sandwich bread for everyday stuff!)

Ingredients:
4 oz. cream cheese
1/4 cup strawberry jam
6 slices bread of your choice
3 eggs
1 tsp. vanilla
1 tbsp. cream


In medium bowl, stir together cream cheese and strawberry jam until combined well; set aside.

In a shallow dish, whisk together eggs, vanilla and cream; set aside.

Spread a heaping 1/4 cup cream-cheese mixture onto each of 3 bread slices.


Cover with remaining 3 bread slices to make sandwiches.

Soak sandwiches in milk-egg mixture 2 minutes per side.


Heat a griddle or large nonstick skillet over medium-high heat.

Add 1 tbsp butter to pan.

Add sandwiches and cook, turning once, until golden brown, 6-8 minutes.


Cut sandwiches in half and serve immediately!

The variations for this wonderful breakfast are unending..use your imagination and your guests will have a breakfast to remember.

Tuesday, August 19, 2008

The Coffee Break

Welcome again to this week's Coffee Break. Today's feature is Toasted Bread Cups.

Are you looking for ways to dress up your lunch menu? Well here's a little secret that will make lunchtime exciting again, whether it is for your family or other special guests gathering around your table.

Begin by preheating your oven to 350 degrees and removing the crusts from 6 slices of sandwich bread.

(Click on images to enlarge)

Place each slice of bread into a greased muffin cup.


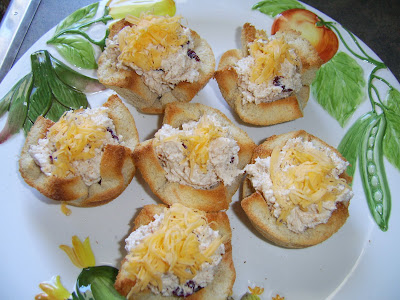
Bake for 15 minutes or until the edges are lightly brown. Remove from oven and voila you have toasted bread cups ready for any filling you would like. These little beauties are perfect for the freezer so go ahead and make extra - then you'll have something cute and quick on hand for those unexpected guests!


In the past I've usually filled our toasted bread cups with either cold tuna salad or hot creamed tuna and both are very good. But today I chose to make a simple chicken salad.

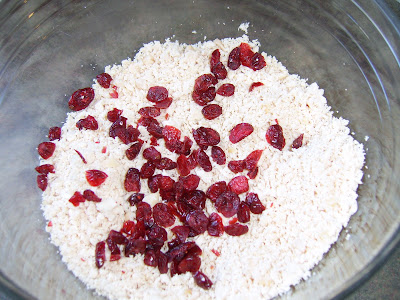
Begin with three cooked boneless, skinless chicken breasts. I had previously baked mine in the oven so that it was ready for whatever I decided would fit in my menu plan. I used my handy-dandy small food chopper to shred the chicken.


I added about 1/2 cup of dried cranberries, salt and pepper and a dash of paprika. Then I added in about 1/2 cup of miracle whip style salad dressing and stirred everything together.


Finally, spoon salad into cups and top with little bits of shredded cheddar cheese.

So fancy!
So tasty!
So easy!


Enjoy.